Here is the translation of an official forum guide published by Eric Musco, which explains the basics of space combat in Galactic Starfighter.
Hangar
When you first open the GS hangar, you will be on the Launch tab. We have already provided you with 3 ships that are ready to go, so you can immediately queue up for battle by clicking the "Battle" button. If you're in a party and want to all cast together, hit the Party Battle button.
After your first battle, you will have some Requisitions that you can spend to buy new ships and components or upgrade existing ones. There are two types of Requisitions: Ship and Fleet.
The Fleet requisitions are a universal currency that can be used to purchase almost anything in GS. However, be careful using Fleet Requisitions as you accumulate them more slowly and there are some things (like ships) that you can only buy with them.
The Ship requisitions are a currency that accumulates per ship when that ship is used in battle. This means that it is possible to have 1000 ship requisitions on one ship, but only 500 on another. Buying something that uses ship requisitions only removes them from that ship's tank. Anything that requires ship requisitions to be purchased will use fleet requisitions to achieve the cost difference, so be careful. [NdWalan: More clearly, if a purchase costs 1000 ship requisitions and you only have 900, the missing 100 will be debited from your fleet requisitions.]
Starting with the Ship tab and going all the way to the Launch tab, let's see how the rest of the hangar works:
Vessels
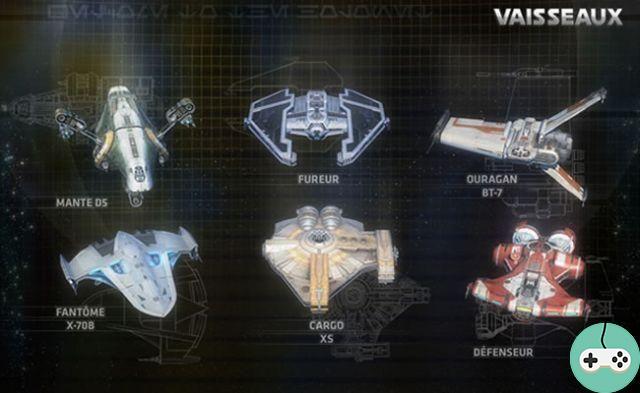
Ships in GS are organized by roles, encompassing categories that define the basic functionality of a ship. Within each role there are many different ships, each with their own unique interpretation of the role.
 The left panel of the Ship tab offers a selection of available ship roles. Clicking on a role will reveal the ships currently available for that role. By default, you'll start with a Scout, Strike Fighter, and Gunship unlocked.
New ships are purchased by spending Fleet Requisitions earned after completing battles. Tap the currency icon next to a locked ship's name to see how much it costs and / or buy it.

Each ship has its own strengths and weaknesses as well as its equipment and modification options, which will be selected on the other tabs. Select a ship from the list to see its visual appearance in the center panel and its technical details in the right panel.
Components
Select a ship from the Ship tab or from the Ready ships bar at the bottom of the central panel and then go to the Components tab.
Components are your ship's weapons, engines, systems, and defenses. Each ship comes equipped with a default set of components that allows you to quickly get to the heart of the action, but as you become a more experienced pilot you will want to choose your own components to suit your flying style.

The components are divided into categories in the left panel. Clicking on a category will show you all of the components you currently own and can equip, as well as those you can purchase with ship requisitions.
Clicking on a weapon or engine component will show you the physical changes made to your ship on the center panel. Clicking on any component will display details and improvement information on the right panel.
Clicking on an unlocked component in the list will immediately equip it on your ship. Locked components are grayed out and can be purchased by tapping the currency icon next to their name.
Component improvements
Each component has a set of upgrades that you can purchase. These improve various aspects of the functionality of this component, for example by making blasters more powerful or engines faster.
Upgrade trees will appear below the descriptions in the right panel. Hovering your cursor over an improvement will show its name and description. Clicking on an upgrade level will allow you to purchase it. For levels with two upgrade options, you are actually purchasing full level access. Once purchased, click on the upgrade for that level that you want to use now.
Cosmetics
While you still have a ship selected (from the Ship tab or the Ships Ready bar at the bottom of the central panel), go to the Cosmetics tab.
Cosmetics are things like paints, blaster color, and engine drag that affect the appearance of your ship. Each ship has access to a number of cosmetic options that can be purchased to customize its appearance.

Clicking on an unlocked cosmetic modification in the list on the left panel will automatically apply it to the current ship or component (in the case of blasters and engines). Locked cosmetics will be grayed out and you can purchase them by clicking on the currency icon next to their name.
Some cosmetics (like paints) will have additional customization options. These options will appear in the right hangar panel and allow you to further customize the look of your modification by purchasing additional options or using the default ones.
Our crew
Crew members are characters that can be assigned to different positions on your ship, granting you bonuses or additional abilities to use in battle. There are two types of crew member positions:
- Support crew : provides your ship with passive bonuses linked to their position
- Co-pilot : provides an additional active ability that can be used in combat
When a crew member is selected, detailed information about it and its bonuses will be displayed in the right panel.
 Crew members can be purchased from the hangar by tapping the currency icon next to their name, but you can also unlock your classmates as crew members as you meet on the ground .
There are four support crew positions for each ship, and each crew member has a specific position they are allowed to fill.
 In the left panel of the crew tab is a list of each position. Clicking on a position will open a list of crew members who can be assigned to that position. Clicking on an unlocked crew member will assign them to that position.
Co-pilots
Your co-pilot is chosen from the currently assigned support crew members. Clicking on the co-pilot position will open a list containing only the currently assigned crew. Clicking on a crew member from this list will assign them as your co-pilot. Your co-pilot is the voice of your ship and will provide commentary during battle.
As with components, each ship can have a different crew.
Ready Vessels
At the bottom of each of these tabs you will see the Ready Ships bar, indicating which ships you have chosen to take into battle. To prepare a ship, simply click on an empty slot and choose a ship from the selection menu that appears. To change an already filled location and put another ship, click on the location and press the Select your ship button to bring up the selection menu.
You can rearrange the ready ships by dragging the icons from one position on the bar to another. Dragging an icon off the bar completely removes it from it.
Combat Display (HUD)
There can be a lot going on in GS's Combat HUD, but if you focus on the center of the screen you'll find most of the information you need to be effective 90% of the time. The following is an overview of the HUD element numbers.
Engime
Your ship has three reservoirs of power that you can manage during combat: blaster power, shield power, and engine power.
Shields, Blasters, and Engines each have their own on-screen indicator showing how much power is left in their tanks. The regeneration of these reservoirs can be managed using the F1 to F4 keys.
F1 = Offensive: weapon regeneration increased, reduced for engines and shields.
F2 = Defensive: shield regeneration increased, reduced for engines and weapons.
F3 = Speed: engine regeneration increased, reduced for weapons and shields.
F4 = Balance: regeneration by default of all power tanks.
Fighting
Most of the information you need in combat will be displayed in the center of the screen. This is where you will find:
- Reticle of fire: the position of your cursor, where your ship is pointed and where your weapons will fire
- Arc of fire: a circle representing the area in which a weapon can fire
- Enemy and Objective Indicators: Icons showing the direction of enemies and objectives that are not currently on the screen.
Other
Three other items on the screen will also be useful during combat:
Scoreboard
The scoreboard shows the current progress of the battle with team scores, objective status indicators and time remaining. The dots around each objective icon indicate the number of currently active defense turrets.
Loyalty card
The map is a top to bottom view of the entire combat zone. On the map you will be able to see the positions and movements of your allies, enemies and objectives within range of your sensors.
Targeting computer
The Targeting Computer is a display that will quickly give you detailed information about your current target, such as their speed, distance, health, shields, and current active effects.

Flight controls
Flying in GS involves a simple combination of mouse and keyboard. Below is some basic control information to get you started.
Direction and movement
The direction is controlled by moving your mouse. Moving your mouse forward and back will cause your ship to pitch up or down. Moving your mouse left and right will cause you to lace up (yaw) on those sides.
The spatial movement is managed by the Z, Q, S, D keys on the keyboard. Z and S control your forward movement by increasing and decreasing acceleration respectively. Q and D will roll your ship left and right.
Holding SHIFT while pressing these movement keys will strap the ship up, down, left, and right.
Acceleration
All ships have a default speed at which they will move whether the pilot is adjusting the acceleration or not. Pressing Z will increase acceleration to the maximum. Pressing S will slow the ship below the default speed, but will not stop it completely. Pressing X will bring the ship to a complete stop until acceleration is activated again.
A visual representation of your ship's current speed is shown on the acceleration gauge on the right of your screen.
By maintaining SPACE to fire boosters, a ship can go faster than its top speed as long as it has engine power to expend.
Engines and maneuvers
Using boosters and some special abilities will consume engine power. Engine power is measured by a bar on the right side of your screen.
Maneuvers are abilities available with most engine components that allow you to perform advanced flight movements while dodging incoming missiles. Motor maneuvers are activated in combat by pressing button 3.

Combat controls
The key to GS fights is to keep your target in sight and never let someone else do it for you. If you're familiar with basic combat controls, that and a little imagination will get you through most engagements.
targeting
In order to destroy an enemy, you must first target them.
- TAB: targets the enemy closest to you
- A: Targets the enemy that damaged you most recently
- E: targets the enemy currently under your reticle
Once you've targeted an enemy, you'll see two crosshairs for them. The first will always be in the center of that ship and will turn red if it is in range. The second indicator, the Lead indicator, shows you where you need to shoot in order to hit the target.
Attack
Each ship has primary and secondary weapons, used with the left and right mouse buttons respectively.
- Primary Weapons: Most primary weapons are blasters that only require you to aim at the enemy guidance indicator and fire.
- Secondary Weapons: Most secondary weapons are missiles that require you to lock them on before firing. To lock, simply hold down your right button when a target is within range and in your firing arc. Release the button when the target is locked to shoot.
- Railguns: Railguns are a special type of secondary weapon available for gunships. Pressing the right mouse button will enter into aim mode (sniping) and the left button will charge your railgun to fire. The more charged it is, the greater the damage inflicted.
capacity
Your choice of systems, engines, shields, and co-pilot will give you additional abilities that can be used in combat.
In combat, abilities will be displayed on component-dependent locations and can be used using the number keys:
- Slot 1: system capacity
- Slot 2: shield ability
- Slot 3: motor capacity
- Slot 4: co-pilot capacity
Some abilities will require you to have a target to use, some will not.
The icons for the positive and negative effects currently applied to you will appear above your shield indicator.

Mode Domination
The Domination game mode requires each team to fight to maintain control over 3 objective satellites in an area. The more goals your team has and the longer you hold them, the more your team's score increases and leads you to victory. Here are some simple tips for winning in domination mode.
Clean
Taking control of the satellites is the best way to score in domination mode. The first step in taking control of an objective satellite is to: DEAD ALL ENEMIES.
These include not only the opposing team's players but also the defense turrets that appear near captured objectives.
Control
As long as there are no enemies within a satellite's capture radius, it can be captured by your team. However, if an enemy arrives nearby the capture process will be interrupted. The key to capturing a helpless satellite is: STAY CLOSE AND KEEP ALL ENEMIES AWAY.
When you capture a satellite you will see its lights change from red to white then to green. When all the lights are green, the satellite has been captured by your team.
Defend
Captured satellites generate points for your team. Over time, turrets will also appear, up to a total of three. However, if there are enemies within the satellite's capture radius, there will be no new turrets. Once you have an objective, the key to victory is: DEFEND YOUR SATELLITE.
In addition to generating points for your team, owning a satellite will also create a new nearby spawn point to help you defend it.
You now have the basics to pilot your own ship. To you the joys of space combat ... Finally when it is available!


